
A bedroom can feel more personal when its details do more than simply fill space. DIY Bedroom Decor Ideas in this roundup range from small, approachable accents to bigger projects that change how the room feels.
Try turning bottles into bedside vases, folding paper into a playful nightstand sculpture, or adding texture to plain dresser fronts with wallpaper.
Other ideas bring color and shape to a larger area, including a velvet headboard made with foam tubes and painted planks that continue from the wall onto the ceiling. Consider which scale suits your space and skills.
Oversized Handles From Wooden Cutting Boards
Credits: Instagram
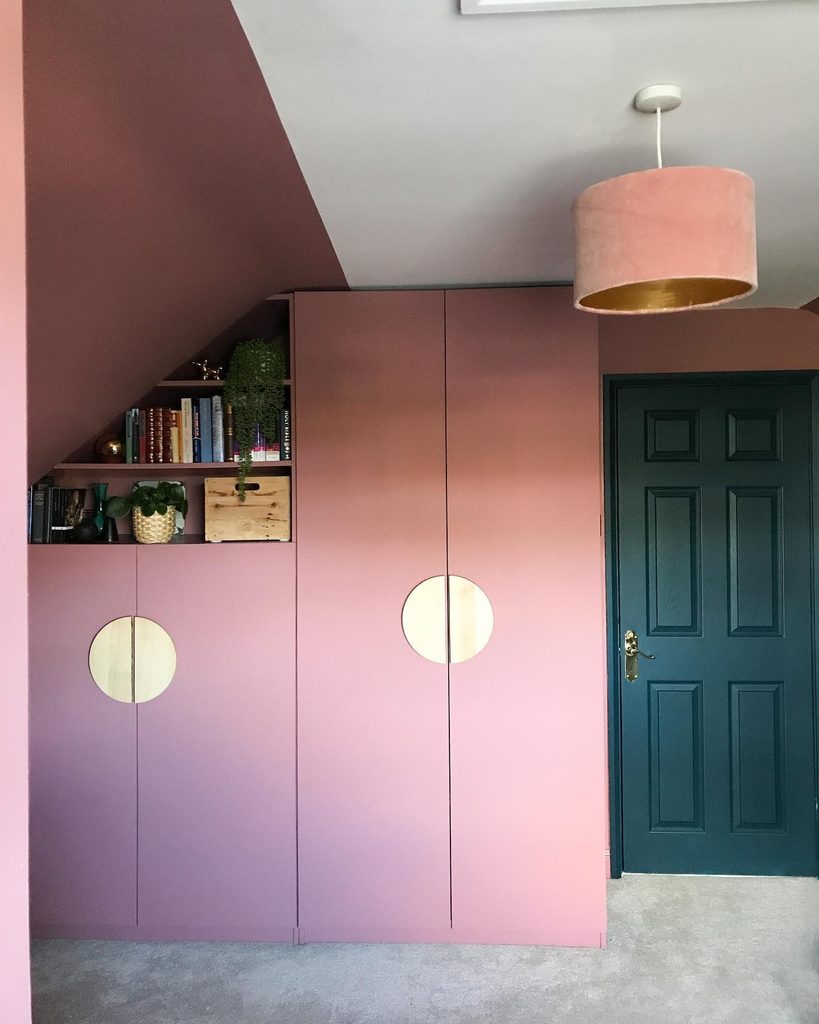
A small detail can change how an entire bank of bedroom storage looks. Evija Roberts gave her pink wardrobes oversized circular accents by turning wooden cutting boards into paired semicircular handles.
She painted the cabinets herself; a professional joiner built the fitted units. That distinction makes this an approachable finishing idea even if constructing wardrobes is beyond your skills.
Try the handle shape against a paper template first, checking that adjacent doors open comfortably and your fingers have enough clearance. A pale wood finish adds contrast against saturated paint, while matching handles could create a quieter effect.
Keep the surrounding door fronts simple so the unusual proportions remain visible. Have difficult cutting or attachment work completed by someone suitably experienced.
Textured Wallpaper Upgrades Plain Dresser Fronts
Credits: Instagram
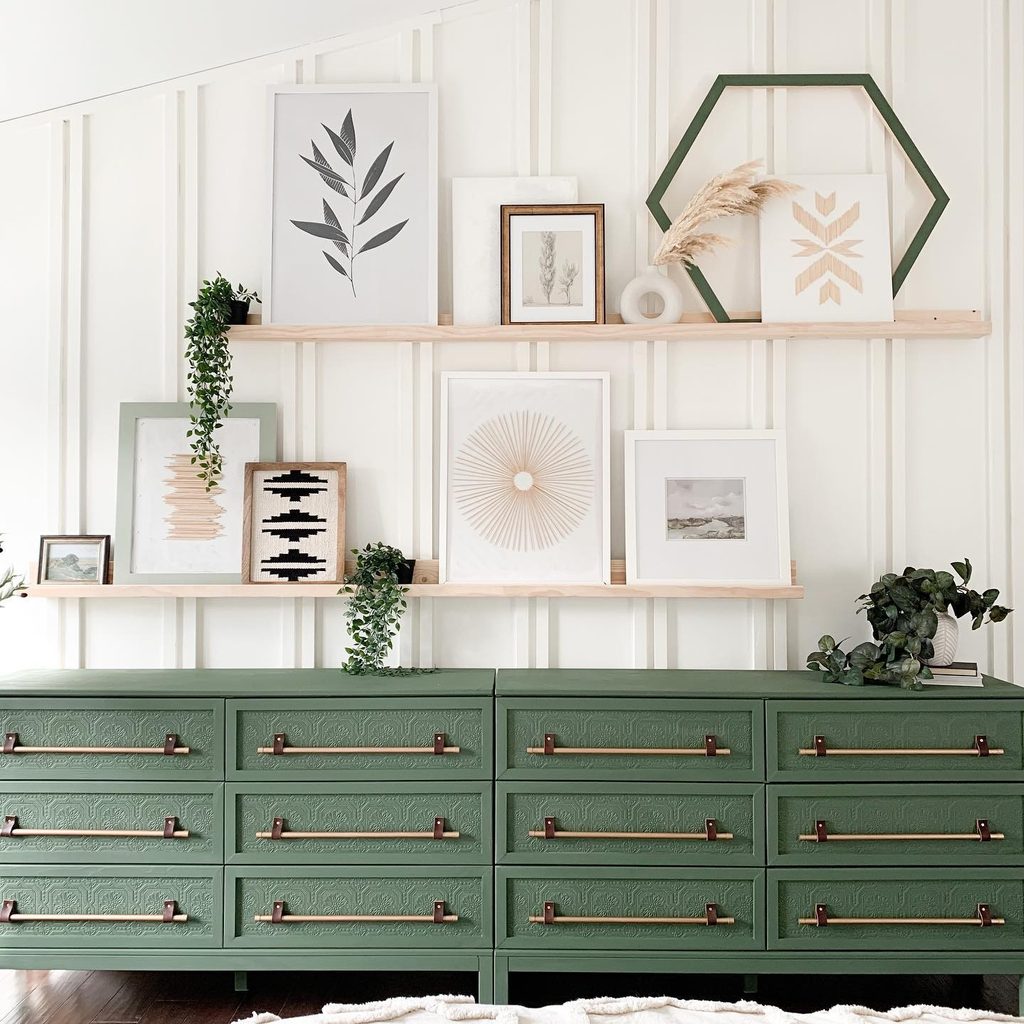
Flat drawer fronts offer room for a surprisingly decorative transformation. Annie of Champagne Chaos covered her IKEA TARVA dresser fronts with paintable wallpaper, creating the raised pattern visible beneath the green finish.
Long metallic pulls add another strong horizontal line, while the surrounding artwork stays relatively light. For your own bedroom dresser, choose a pattern that remains readable at the scale of each drawer.
Check that the added surface will not interfere with the gaps or hardware before committing. A single paint color across the furniture helps the texture feel intentional.
You could test the treatment on a sample board to compare finishes and adhesion. Let the transformed dresser provide the detail, then keep its top useful for everyday essentials.
Foam Tubes Shape a Velvet Headboard
Credits: Instagram
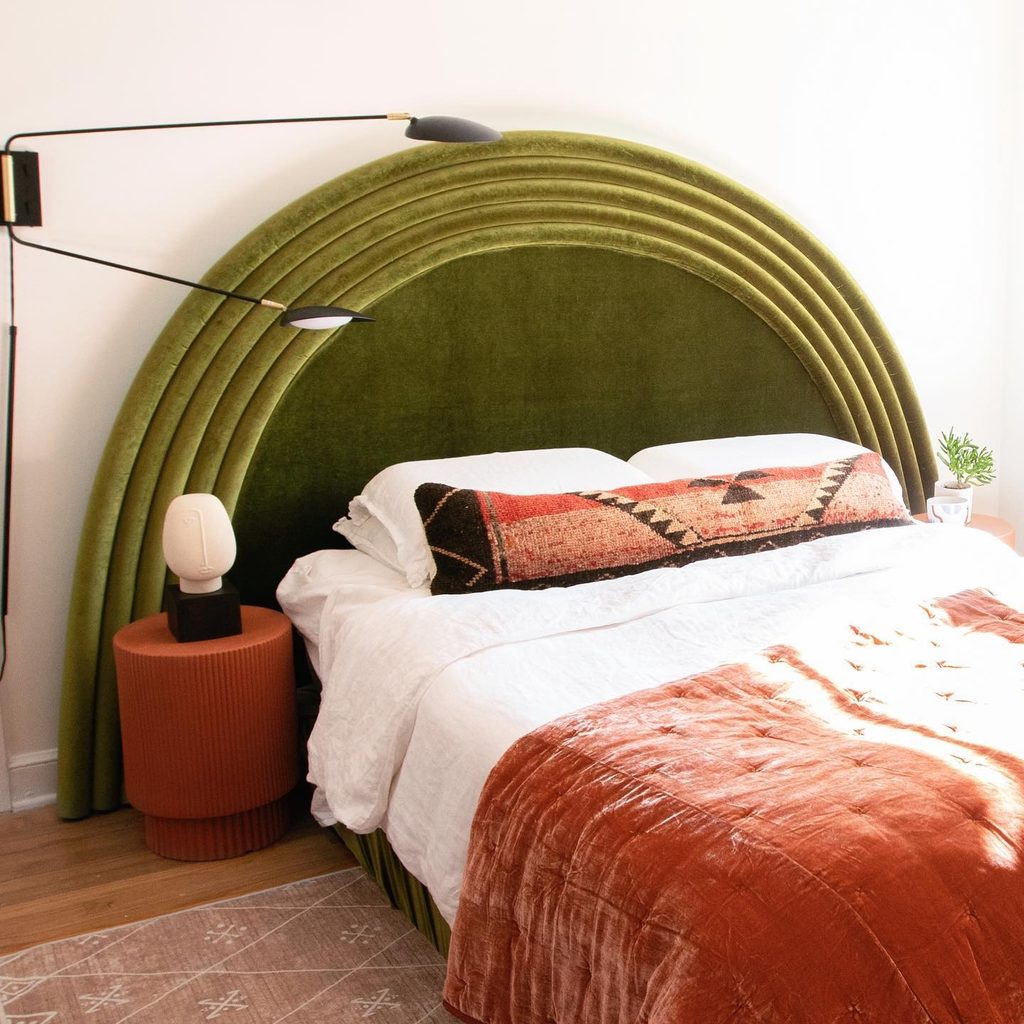
Unexpected craft supplies can produce a substantial focal point when the shape is carefully planned. Photographer Margaret Wright made this green velvet headboard using foam tubes, including pool noodles, to create the rounded channels surrounding its padded center.
The repeated curves soften the straight edges of the bed and bedside furniture. Before adapting the idea, map the complete silhouette against your mattress and check where pillows, outlets, and lights will sit.
Choose one fabric throughout if you want the layered outline to remain easy to read. Wright documents her process in a linked project tutorial, which is the appropriate starting point for construction details.
Keep the finished piece securely supported, and assess its suitability for your own frequency of use.
Rainbow Planks Continue Onto the Ceiling
Credits: Instagram
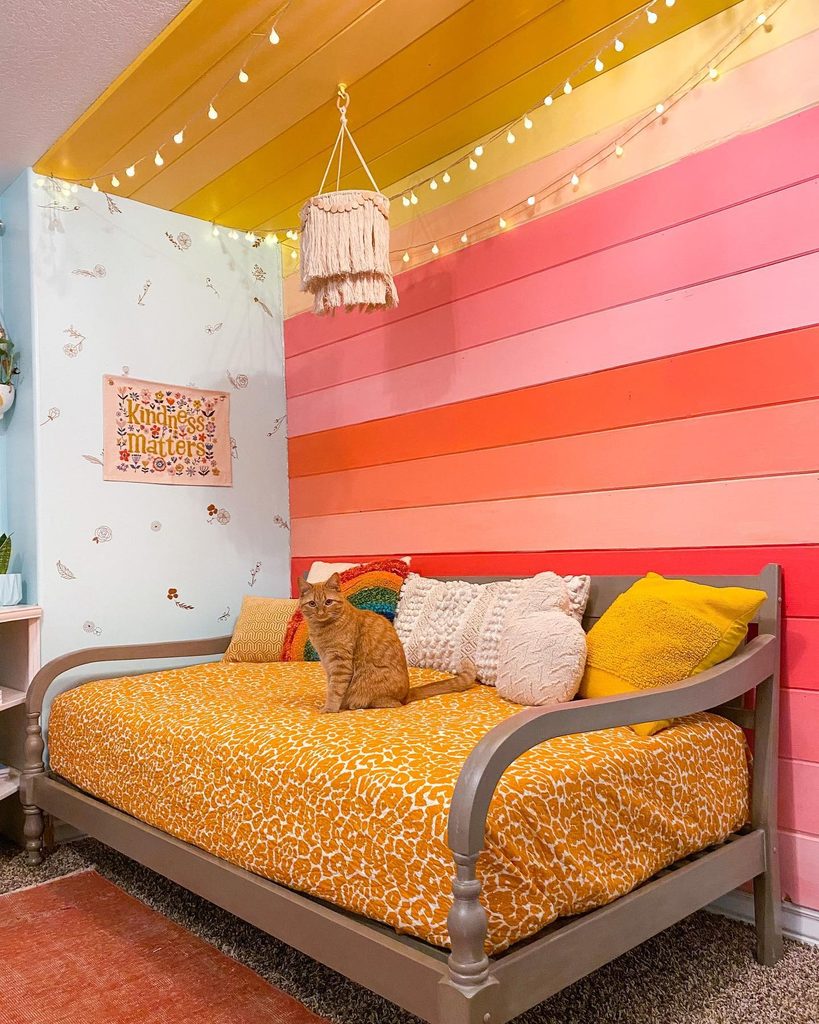
Warm bands of color give this sleeping nook an unmistakable personality. Laurel Harry and her family painted horizontal planks in pink, coral, and yellow, continuing the treatment onto the ceiling above the daybed.
The result surrounds the bed with color without requiring the same intensity on every wall. To adapt it, choose a limited set of related shades and sketch their order before painting.
Repeating a favorite shade in the bedding can connect the finished wall to the rest of the room. This is a larger project than an ordinary painted stripe, so plan the board layout and attachment method carefully.
Get experienced help for overhead installation. The effect also depends on leaving nearby surfaces quieter for visual breathing room.
Gilded Bottles Become Small Bedside Vases
Credits: Instagram
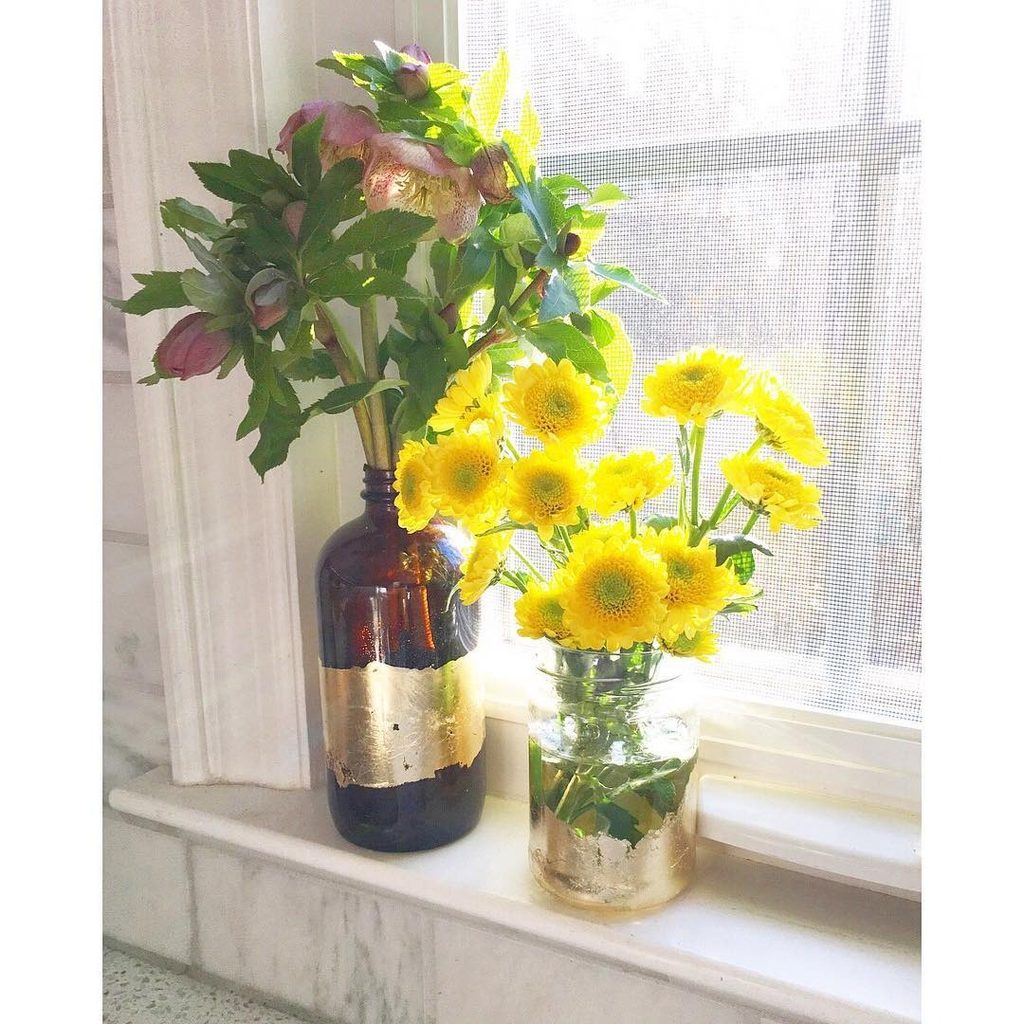
Empty containers can become decorative accents worth keeping on display. Brittany of Pretty Handy Girl transformed a brown bottle and clear jar with irregular gold leaf, then filled them with flowers.
The visible glass keeps the finish from feeling heavy, while the different heights make the pair interesting together. Borrow the idea for a bedroom dresser or windowsill, choosing containers that are stable and easy to clean.
A narrow bottle suits a few stems; a wider jar can hold a fuller arrangement. Test your chosen gilding products on a spare container and follow their application instructions.
You could repeat one metallic detail already in the room to connect the project with existing furniture. Protect nearby surfaces whenever you use water.
Folded Paper Adds a Playful Nightstand Accent
Credits: Instagram
An angular little owl can bring character to a bedroom without taking over the room.
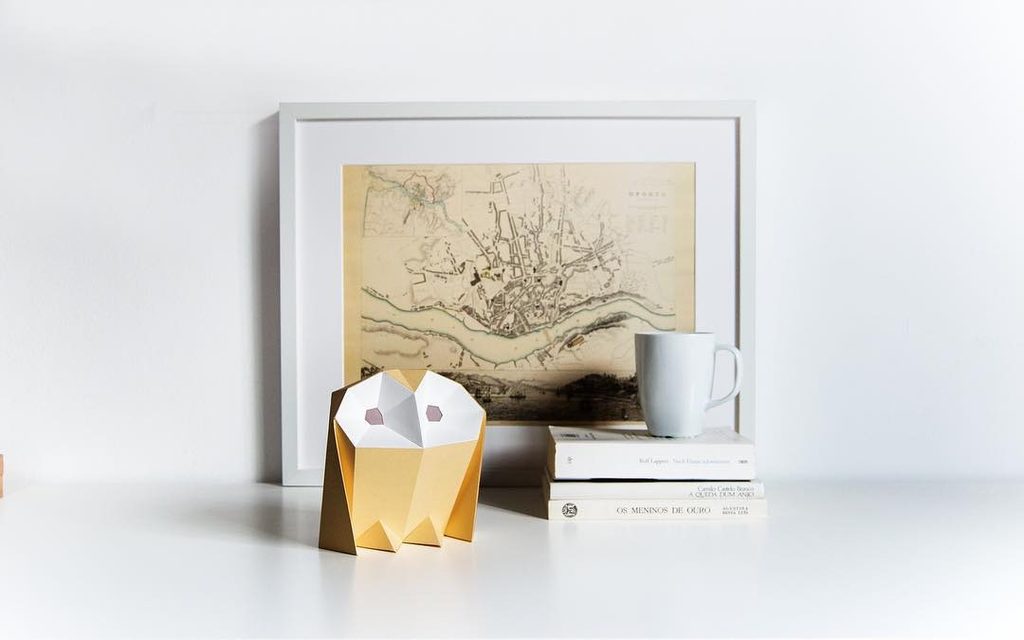
This yellow and white example comes from Owl Paperlamps, whose designers create original papercraft kits that people assemble by scoring, folding, and gluing the supplied pieces.
The photographed model sits beside books and a framed map, showing how a small sculpture can hold its own within a simple arrangement. Try that scale on a nightstand or shelf, leaving enough usable space for your normal routine.
Follow the kit’s assembly guide rather than improvising a pattern from the photograph. If you choose an illuminated version, use the specified light source and the maker’s safety guidance. Keep the surrounding palette restrained so the folded shape remains clear.
Sew Fabric Scraps Into a Floor Pouf
Credits: Instagram
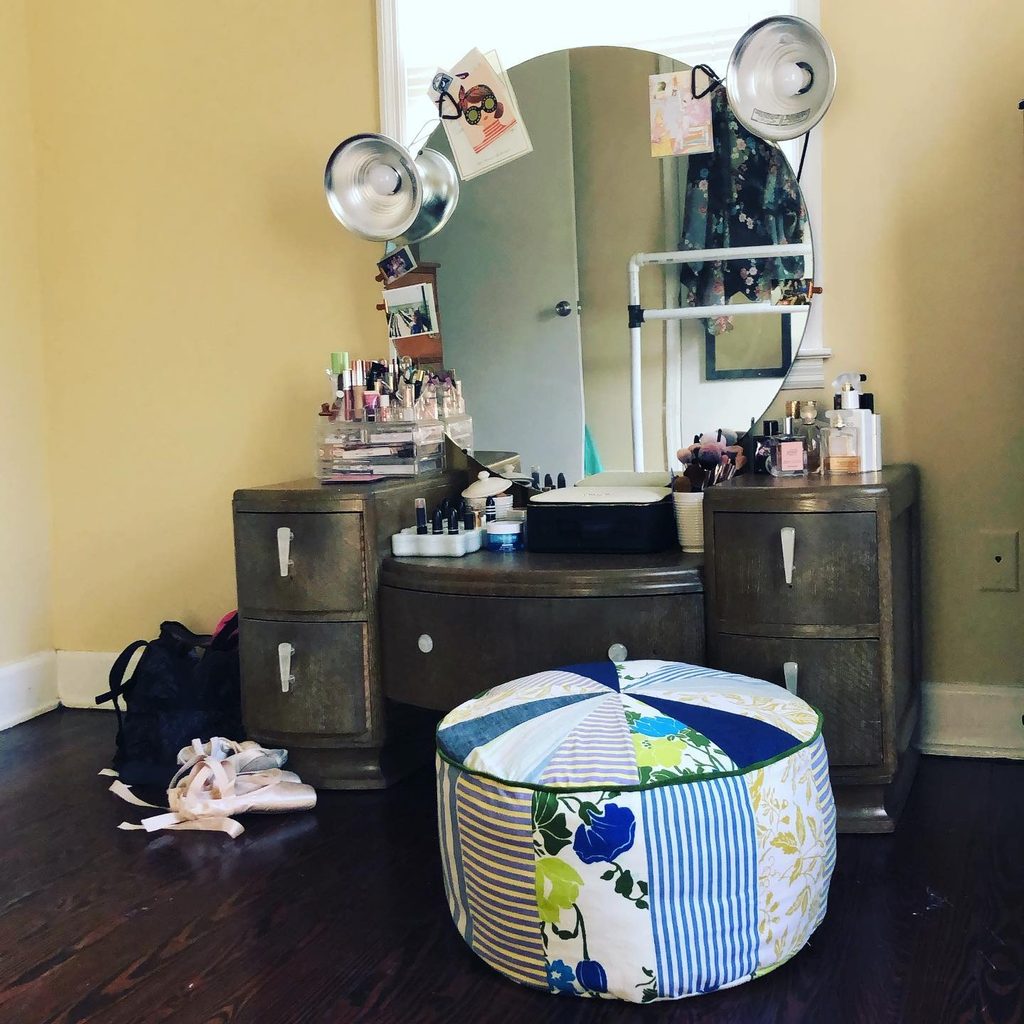
Leftover cloth can become something much more useful than a crowded scrap basket. Abby McDowell stitched this patchwork pouf from larger fabric remnants and filled it with smaller scraps, using a Closet Case Patterns design.
Blue, green, yellow, and white prints repeat across the wedge-shaped top and vertical sides. In her dressing room, it sits beside a vintage vanity; a bedroom dressing corner could use the same flexible accent.
Gather your fabrics together before sewing and repeat a few colors to connect different prints. Follow a tested pattern for the structure, seams, and closure instead of guessing their proportions.
Abby used a zipper underneath, which keeps access discreet. Leave enough clearance around the finished piece for drawers and everyday movement.
Paint Mountain Silhouettes Across a Bedroom Corner
Credits: Instagram
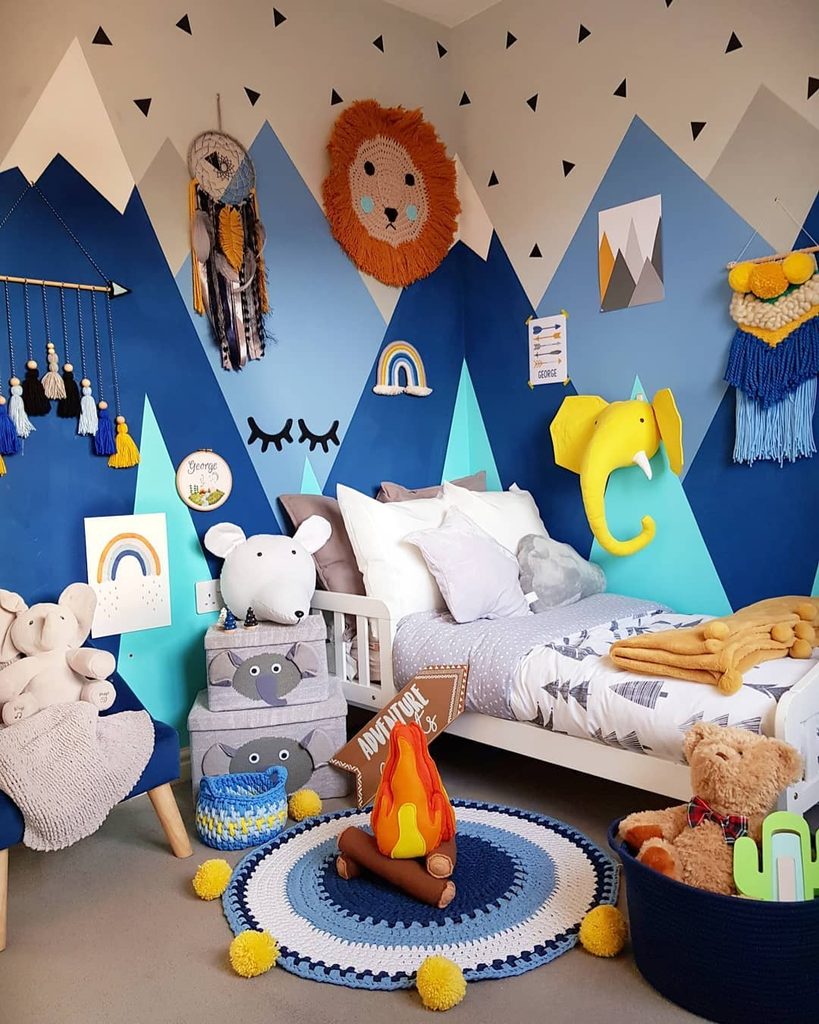
An uneven outline can make a painted feature feel more personal than a straight stripe. Nicole Roberts created overlapping mountain silhouettes across two walls of this bedroom, using blue, gray, and white to give the scene depth.
The picture shows how a corner can become part of the composition instead of interrupting it. Sketch your peaks before opening the paint, checking how their heights relate to the bed and nearby furniture.
Vary the widths and spacing so the landscape feels relaxed. For an adult bedroom, you could use a quieter range of closely related colors.
Keep bedding relatively simple when the wall carries this much movement. Test the colors together in the room’s light before committing to the whole mural.
Repurpose a Closet Shelf Behind the Bed
Credits: Instagram
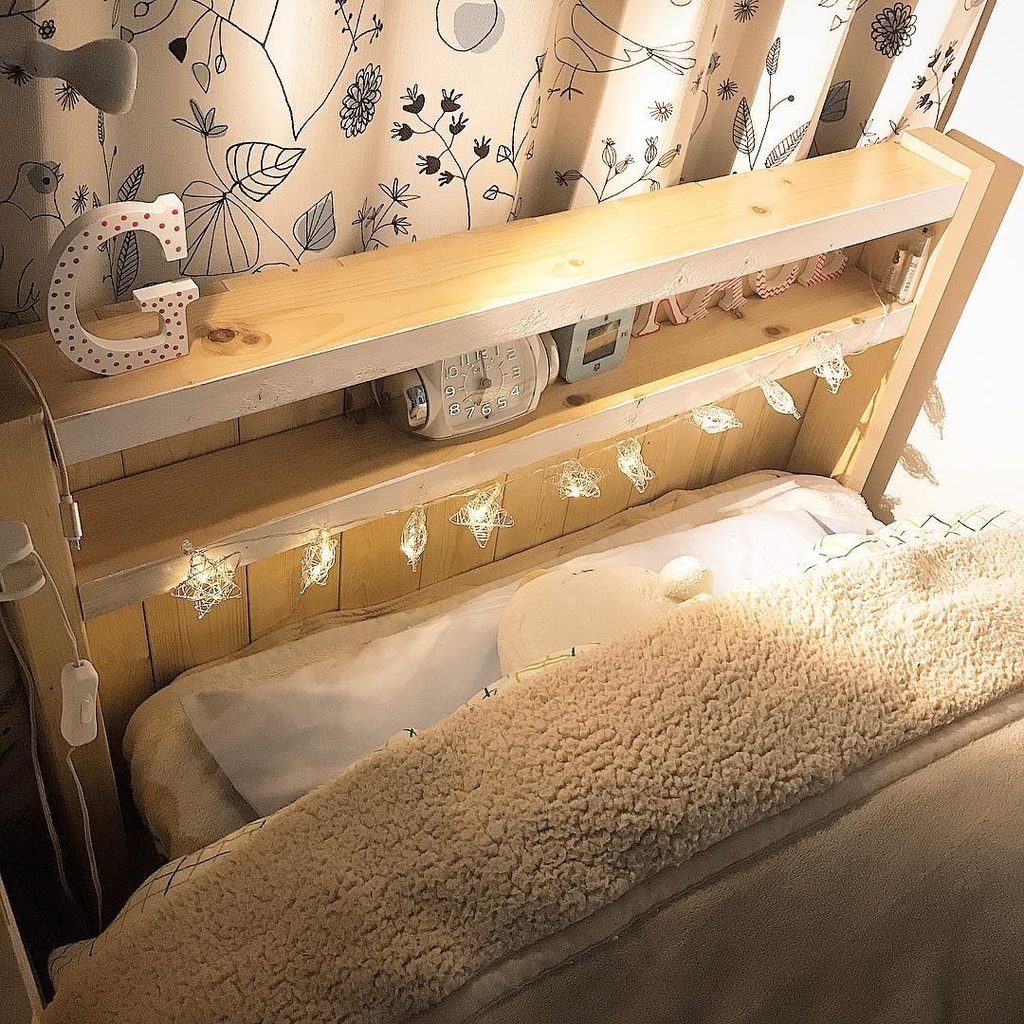
Something already sitting in a closet might offer the starting point for a useful bedroom project. Kari remade a closet shelf into the pale wooden headboard shown here, incorporating shallow ledges for small decorative objects.
Vertical boards give the piece rhythm, while the horizontal shelves break up the height and provide room for a clock. Consider what an existing component can realistically support before giving it a new purpose.
Measure the bed, pillows, and wall space, then decide whether ledges would be comfortable behind your sleeping position. Keep displays sparse and secure anything that could fall.
The appealing part of this idea is its resourcefulness: a familiar household piece becomes a distinctive backdrop without needing a new design from scratch.
Arrange Branches Into Sculptural Wall Art
Credits: Instagram
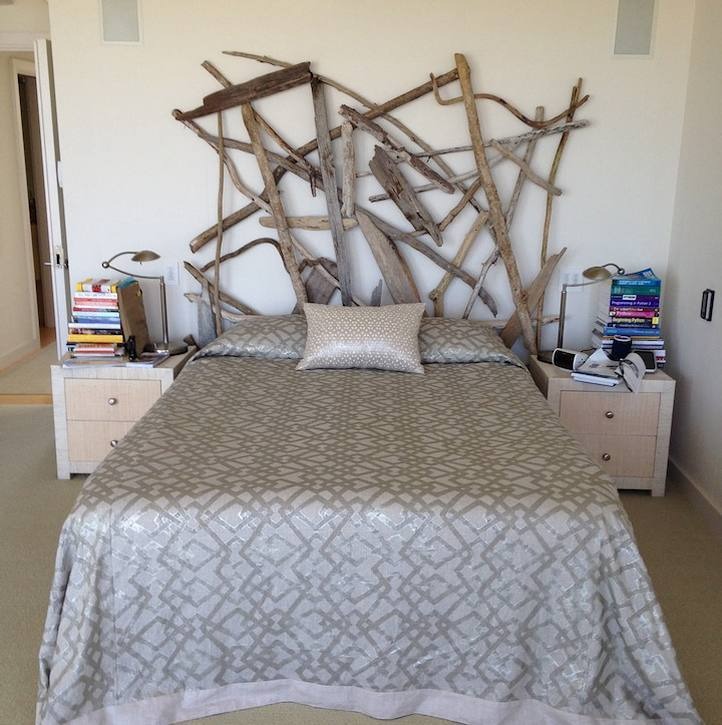
Natural irregularity brings a different kind of pattern to the wall behind this bed. Artist David Ward arranged branches into a sculpture, creating a dramatic composition against the simple pale background.
This is a maker’s custom installation, so treat its appearance as inspiration rather than a ready-made construction plan. A smaller branch arrangement on a separate bedroom wall could explore the same contrast between organic shapes and clean architecture.
Decide on the overall outline before choosing individual pieces, and leave open spaces so the arrangement can breathe. Keep the surrounding bedding calm to let the wood take focus.
Heavy or overhead artwork needs suitable mounting and experienced installation; never assume an attractive arrangement is safe simply because it looks balanced.
Dress a Plain Mirror With Decorative Moldings
Credits: Instagram
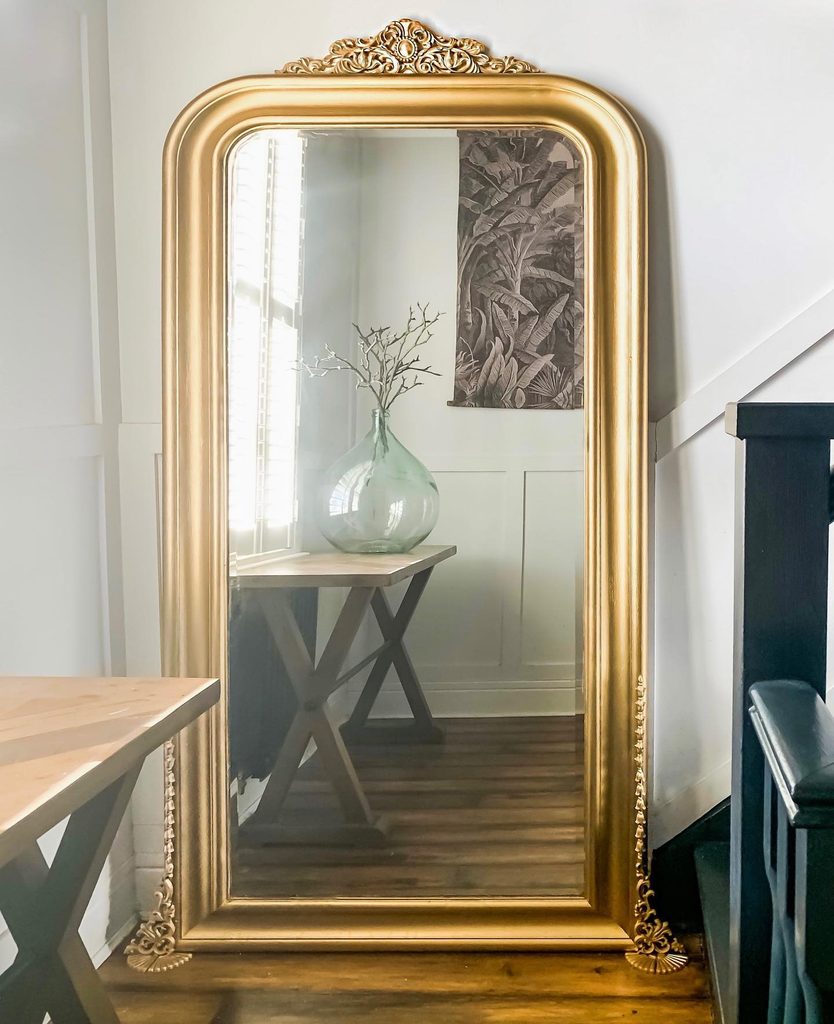
A tired frame can gain a different character through a few considered details. Ruth transformed her existing IKEA SONGE mirror with gold spray paint and wooden decorative moldings, producing the ornate crest and corner flourishes shown here.
Although photographed in a hall, the finished piece offers an appealing idea for a bedroom dressing area. Match the scale of added ornaments to the frame so they look integrated rather than crowded.
Protect the glass while preparing and finishing the surround, and follow the chosen products’ instructions. Before placement, arrange appropriate support or wall attachment for the mirror’s size and weight.
You could pair the detailed frame with an otherwise simple dresser, allowing its curves to provide the room’s strongest decorative accent.
Loop Colorful Yarn Into Bedroom Wall Art
Credits: Instagram
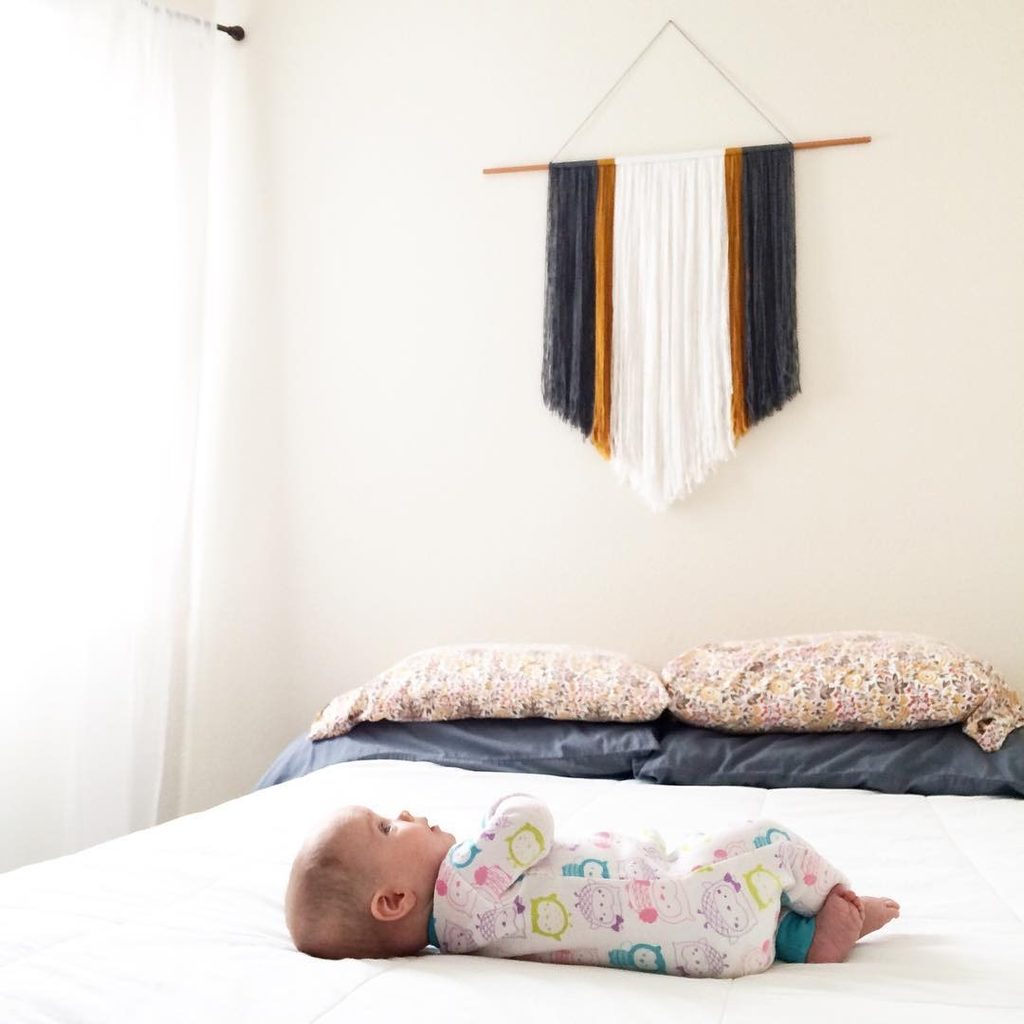
Soft strands give an empty wall color and texture without the visual weight of a framed picture. Deonna Wade made this guest-bedroom hanging by looping yarn over a copper-painted dowel.
White occupies the center, with dark gray and mustard bands toward the sides and a tapered edge below. The limited palette keeps the homemade piece orderly even though its surface is loose.
Try arranging your colors on a table first, then compare the width with the furniture beneath the planned location. You can adapt the length to fit a narrow wall or a broader space above a dresser.
Keep the hanging clear of lights and moving furniture. Repeating one yarn color in a pillow would connect the two surfaces gently.
Build an Open Cubby With Crossed Legs
Credits: Instagram
Bedside storage can look airy while still providing space for everyday essentials.
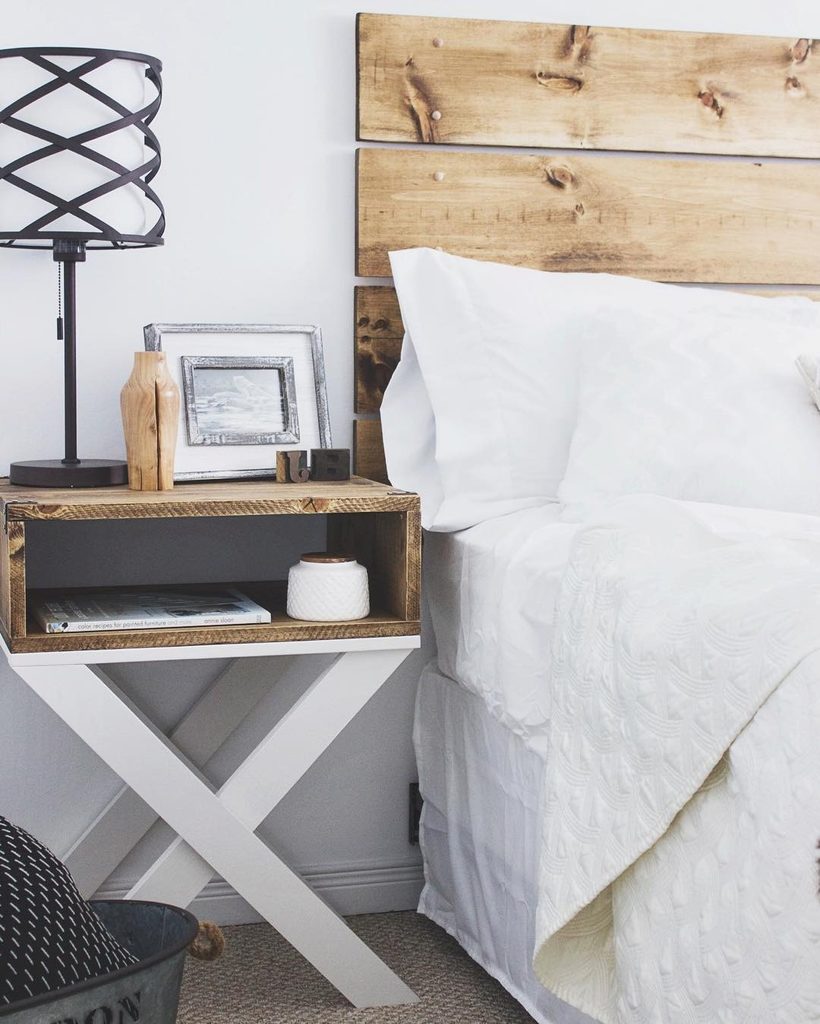
Britt Stager and her partner built this nightstand with an open wooden cubby and white crossed legs, giving the guest room a practical mix of display space and easy access.
The darker box relates to the plank headboard, while the pale base blends into the surrounding walls. Plan a homemade table around the height of your mattress and the items you actually reach for.
An open compartment is especially helpful for a book or small basket. Follow the maker’s documented construction guidance and address stability: Britt secured these tables to the wall after finding them top-heavy with lamps. Keep accessories modest so the top still serves everyday needs.
Shape a Painted Dish for Bedside Jewelry

Credits: Instagram
Small belongings deserve a landing place that is pleasant to look at every day. Jess Sullivan’s handmade heart-shaped dish combines a blue and lavender background with pink clouds, yellow stars, and a crescent moon.
A ring and necklace show its intended use clearly. The idea translates to a bedside table, where jewelry often ends up loose beside a lamp.
If you make your own clay catchall, choose a simple outline and a motif that suits your room rather than copying every painted detail. Follow the clay and finish manufacturers’ directions for shaping, drying, and decorating.
Keep the finished dish for dry small items unless its materials are specifically suitable for other uses. One colorful piece can personalize otherwise quiet furniture.
Refresh a Secondhand Lamp With an Aged Finish
Credits: Instagram
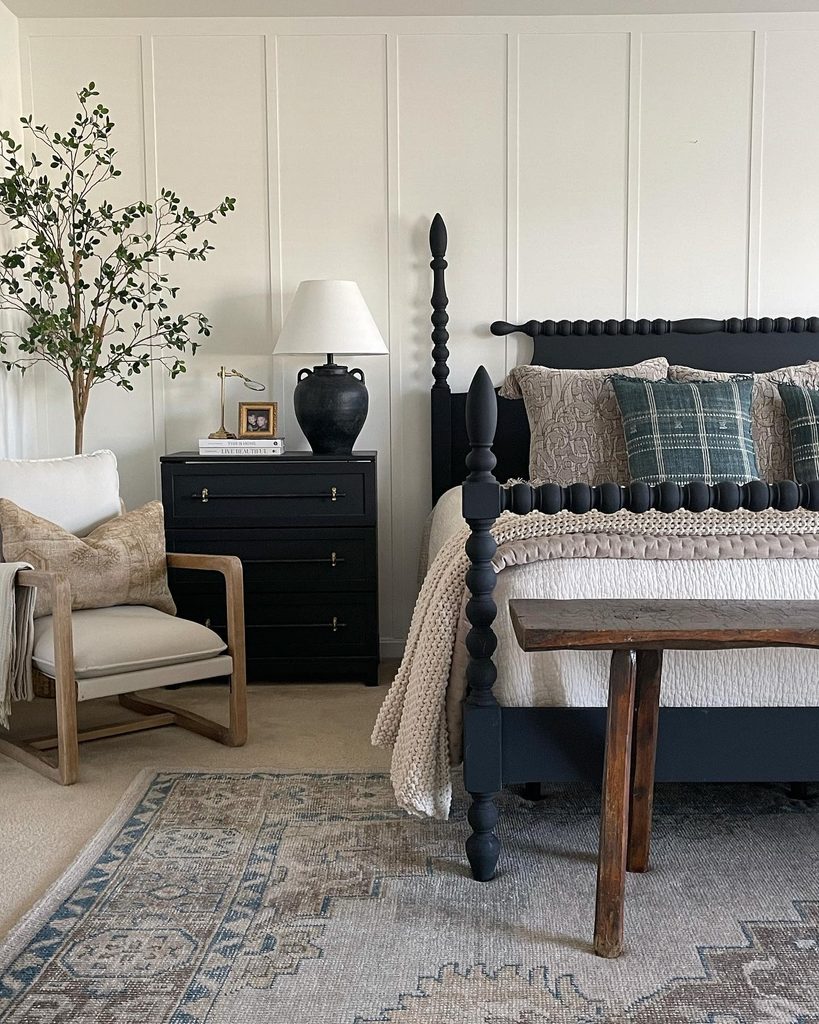
Older lighting often has a useful shape hidden beneath an unappealing finish. Louisa found her bedside lamps through Facebook Marketplace and changed their appearance with paint and antique glaze.
The dark, mottled base shown here sits beneath a white shade, connecting neatly with the black bed and nightstand. Consider the shape and proportions of a lamp before dismissing its color.
For a similar surface makeover, choose finishing products suitable for the existing base material and test the effect somewhere discreet. Work with the lamp unplugged, protecting the socket, cord, and other electrical parts from finishing products.
Any necessary electrical repairs belong with a qualified professional. A restrained aged finish can make a familiar object feel more suited to your bedroom.
Lay Out a Large Grid of Wall Trim
Credits: Instagram
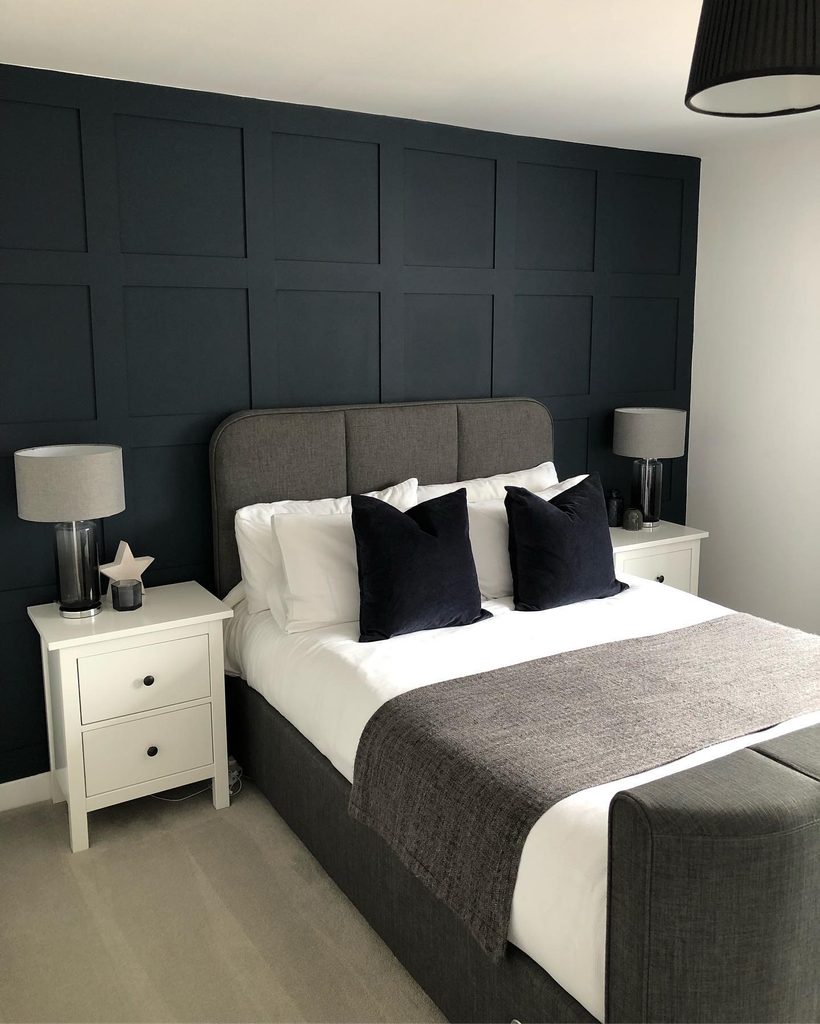
Empty wall space gains structure when its divisions are planned around the furniture. Ian and Michael created this navy paneled wall themselves, using a large grid to frame the bed without crowding the surrounding area.
The dark finish emphasizes the raised trim, while the gray upholstered headboard softens its geometry. Mark out a proposed arrangement with removable tape before cutting anything, considering switches, outlets, ceiling edges, and bedside furniture.
Check the pattern from the doorway as well as from the bed. Larger divisions can help a modest room feel less visually busy than a dense grid.
Use the same color on wall and trim for a unified result, and plan safe attachment around the actual construction of your bedroom’s walls.
Turn a Favorite Shirt Into a Keepsake Pillow
Credits: Instagram
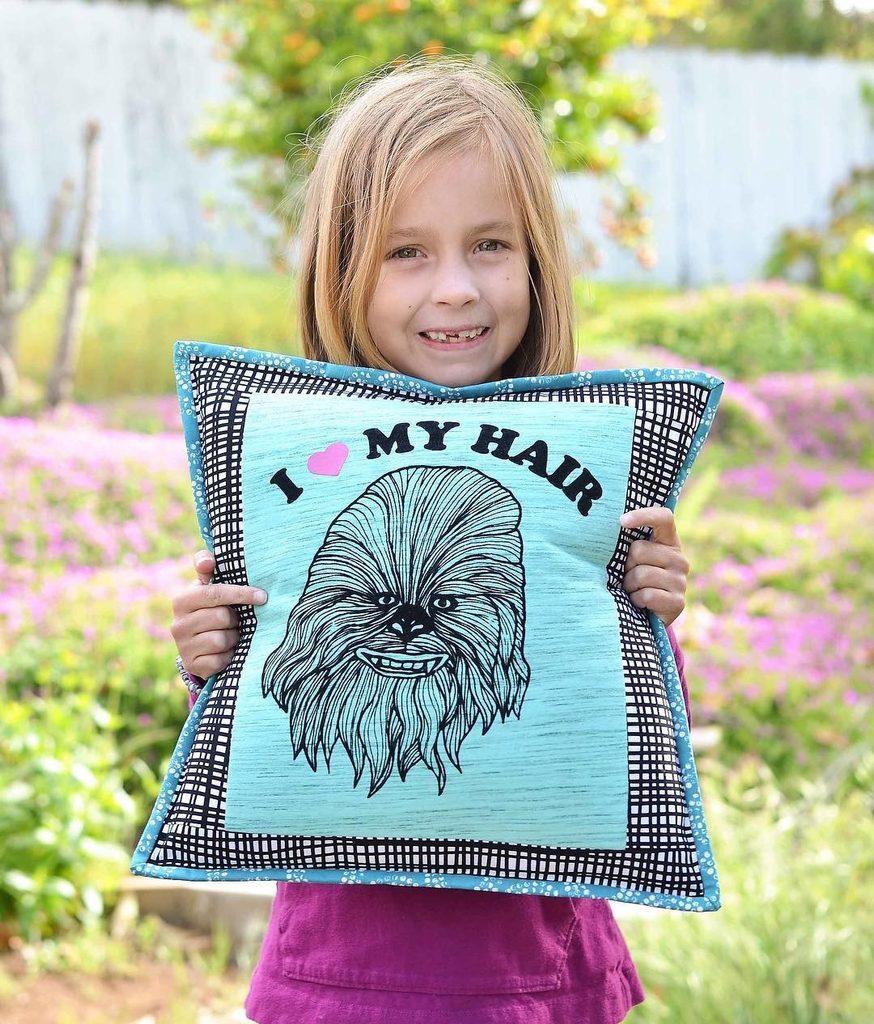
Outgrown clothing can keep its sentimental value after it stops fitting. Erica Taylor Jackman turned a graphic T-shirt into this square cushion, adding a patterned fabric border and a coordinating edge.
The original photograph presents the finished pillow outdoors, but the project would make a personal accent on a bedroom chair or bed. Choose a shirt whose design is clear and whose fabric is in usable condition.
Leave enough space around the graphic for seams so important details remain visible. A sewing tutorial suited to stretchy fabric will help you plan support, backing, and closure without distorting the image.
Pick border colors from the shirt or the room’s existing textiles. The result can preserve memories in a useful everyday form.
Braid Discarded Shirts Into a Circular Rug
Credits: Instagram
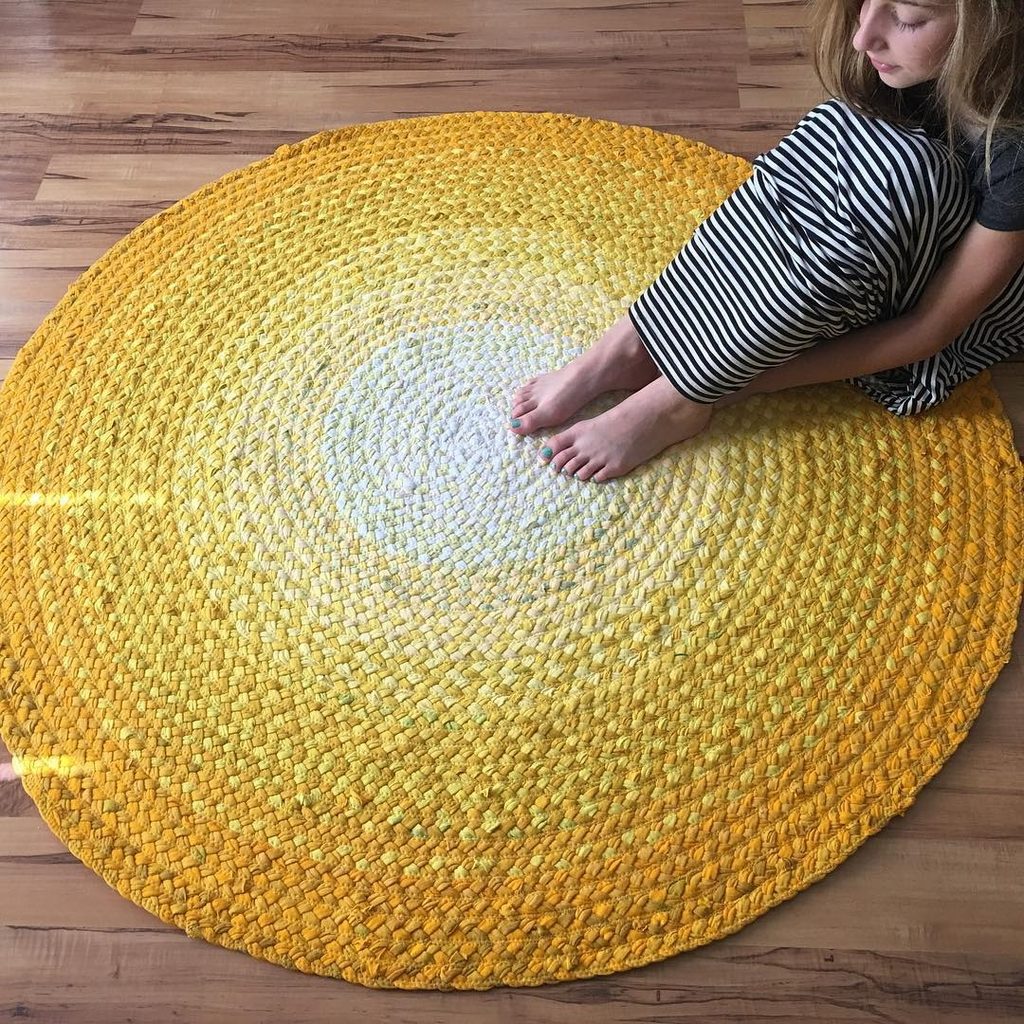
Circles can soften a bedroom filled with straight furniture edges. Marissa Melakian braided recycled T-shirts into this round rug, arranging the colors from a pale center to a yellow outer ring.
The gradual shift gives the finished piece a clear design even though it uses reclaimed material. Consider a smaller version beside a bed or in a reading corner if you want a manageable starting project.
Sort the fabric by color before committing to the layout, and follow a tested braided-rug pattern for joining and finishing. Check that the result lies flat, and choose an appropriate nonslip underlay for your floor.
Leave door swings and walking routes unobstructed. Those unwanted shirts can become a cheerful part of the room again.
Turn Spare Wardrobe Space Into a Reading Nook
Credits: Instagram
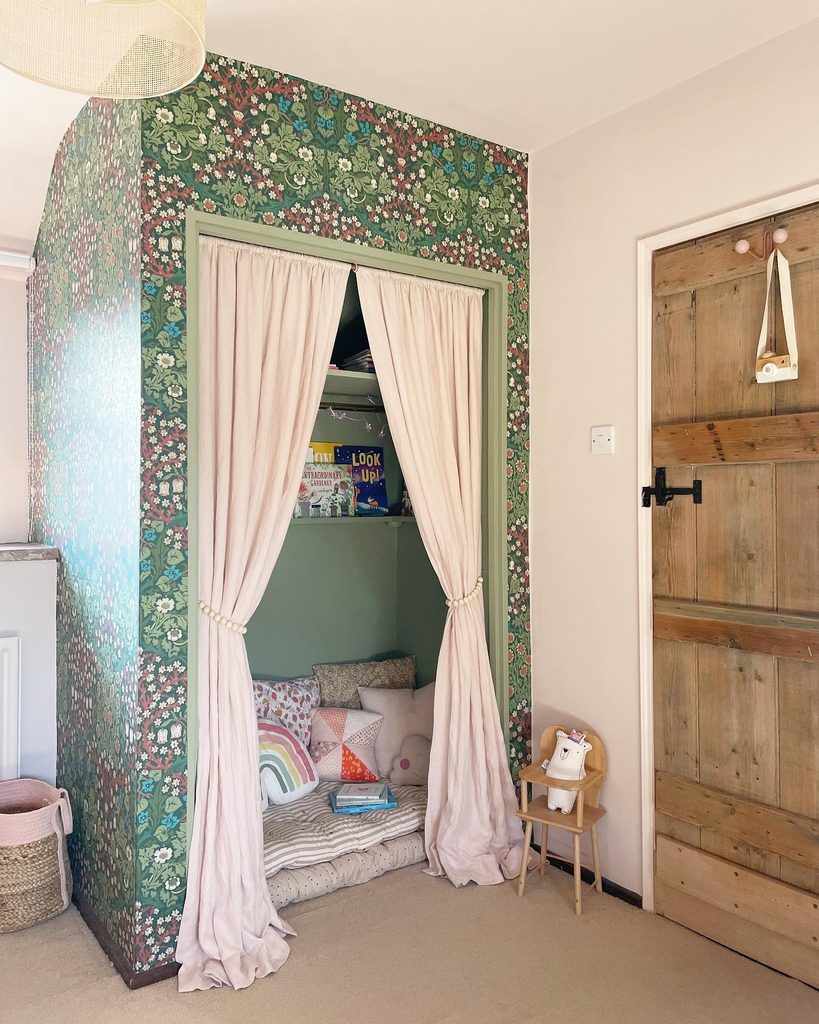
An underused closet can become the most inviting corner of a bedroom. Hannah Otto removed warped wardrobe doors and adapted the space into a reading nook, adding accessible book ledges and curtains she sewed from duvet covers.
Green floral wallpaper frames the opening, while pale pink fabric and floor cushions make the small enclosure feel welcoming. This works best when the room has enough clothing storage elsewhere.
Assess the interior dimensions and ventilation before choosing how someone will sit comfortably inside. Keep shelves securely attached and place frequently used books within easy reach.
For a simpler version, concentrate on paint, a cushion, and properly supported curtains. The useful change is giving an existing enclosure a purpose that suits daily life.
Build a Compact Wall-Mounted Vanity Organizer
Credits: Instagram
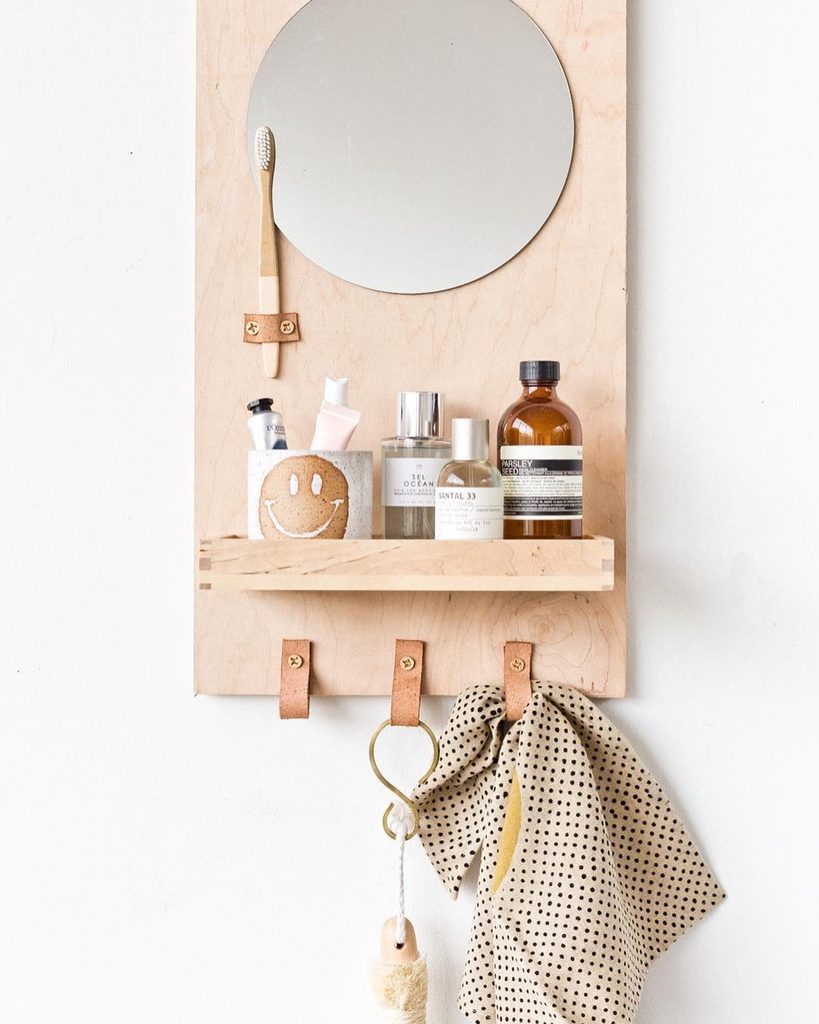
Morning essentials are easier to manage when they have a compact place of their own. Brittni Mehlhoff built this wooden caddy with a round mirror, shallow tray shelf, and leather hanging loops.
Its original bathroom setup can inspire a bedroom vanity, with the tray reserved for a few grooming items and the lower loops holding lightweight accessories.
First, decide which objects need to fit so the organizer remains useful rather than becoming crowded. Follow an established woodworking plan, checking the shelf construction and wall attachment for the intended load.
Position the mirror at a comfortable viewing height and keep nearby drawers clear. The combination brings several functions together on one backboard, making it a thoughtful project for a dressing corner.